Summary: in this blog post, we are explaining a reliable and helpful guideline for those users who are looking for a solution on how to import Outlook Offline folders to Outlook for Outlook 2019, 2016, 2013, and any other below version. Now read this post and get the complete solution for your query.
How to Move OST Data File to Outlook PST Manually?
Follow the step-by-step method to import your OST to PST file format manually:
1. Open the Outlook application on your machine properly.
2. Then, click on file tap >> info >> account setting.
3. In the account settings from the email section and click on MS Exchange.
4. Select more setting
5. From the MS Exchange window, hit on the “Advanced”
6. Go to the offline folder file setting.
7. Type path of OST file in the file field.
8. Press OK and click the finish button.
The manual method will help you to convert OST files into Outlook. It is risky as if you don’t follow any step perfectly then it will make a problem. So for that case, I advise you to try an alternative method i.e. OST Converter. It will help you to open your offline OST file in Outlook PST format. For more knowledge and satisfaction, before buying it you can use its demo version.
Effortlessly Solution to Import Emails from OST to PST without Outlook
OST Converter is an effective and reliable utility and a well-programmed solution for users who are searching for a way to import OST file in Outlook PST file that is suitable for all MS Outlook versions such as Outlook 2019, 2016, 2013, 2010, and etc. Any home user or technical user can use it and perform OST to PST conversion directly with successful results. It also keeps the complete email formatting, size of the attachments, meta-header details, etc. intact without any alternation. So, it is the perfect solution to resolve the query of “how to import Outlook Offline folders to Outlook” within a few minutes on any Windows Operating Systems including Windows XP, 7, 8, 8.1, and 10. Now, teach a step-by-step working guide of the software to solve your query without any issue.
Steps to Import OST Files to PST Format with OST to PST Tool
Step 1. Download and install the software on your windows machine perfectly.

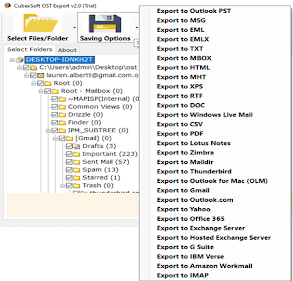
Step 2. After launching the software, you can load OST files by clicking Add Files, Add Folders, or Outlook Profile option.

Step 3. After OST file selection, you can see the number of selected .ost files. Then, select the checkboxes for the conversion process.

Step 4. Now, click on the Export to Outlook PST option and press the Browse button to save the converted files, and Click on the Convert button.

Step 5. After completing the whole process, the software shows a message “Conversion Completed Successfully”. Then press Ok to finish.

Try Free Edition – OST to PST Converter
Try the free demo facility of the software is also presented for users to check its working before buying its license version. The demo edition permits users to export the first 25 emails from OST files to PST format without any charges. After complete utilization and satisfaction, you can purchase the full license key of the software to save Outlook. ost files to PST file format in a bulk mode at once on any Windows OS editions.
Also, Read This Blog >> Convert OST Files to PDF
Conclusion
Here in this article, we have explained both manual and technical solutions to solve “how to import Outlook Offline folders to Outlook”. You can try both solutions and then decide which solutions work better and that suits you need to move OST to PST data files along with complete details. For exporting a few data items of OST file to Outlook, the manual method is perfect. But, if you have migrated multiple OST data files, then you can go with the professional software that is compatible to migrate a large-sized OST to a PST file in a batch mode at once.
This comment has been removed by the author.
ReplyDelete